Welcome to another coding tutorial! As the title says, we are going to add Docker to a MERN Full Stack application! I’m honestly tired of people telling me it’s easy to learn Docker because I find the documentation a little confusing, so I created this tutorial to help out developers and engineers looking to add this skill in an easy to digest manner. So, I’m going to explain what problems Docker solves then how to include in our app.
Some prerequisites before we get started:
- The IDE I am using for this tutorial is VS Code, which you can download here.
- Next you need to download Node.js here in order to use npm.
- Lastly, you need to go here to download Docker Desktop to see our images and containers (Don’t worry about the lingo, I’ll explain it in a bit).
The Problem
So, what problem does Docker solve exactly? For developers and engineers without professional experience, it’s hard to see what Docker actually accomplishes? I mean we are able to build our project with a nice UI and functionality, build it, deploy it, and host it without a problem! However, imagine we go to GitHub and we see this really cool project! We clone the code into our IDE, install all the packages, start in our local machine and… it breaks. Or there are dependency conflicts. Maybe there is an error on your operating system? The problem is that technology moves too quickly! There’s a new framework version (Curse you Next.js 13!), or an updated dependency (curse you Bootstrap!), or maybe there is some obscure library that was independently made and has been deprecated (Curse you react-native-level-fs!). Over time, projects even one month old are at risk of falling to this problem. But there is a solution!
Introducing Docker! Docker contains (containerizes?) our entire application and its current version of dependencies. That means any person who gets a copy of the code, can run it successfully on any computer. This is especially helpful for a team working remotely on different operating systems, working on projects with a long development cycle, or even running old code you had saved down the line.
Setting up the Code
So, the first thing we’re going to do is open up our VS Code. Next we want to open our terminal (for Windows, ctrl + j is a nifty shortcut) and clone my sample project here. We’re going to clone the main branch by typing git clone https://github.com/christiandeandemesa/mern-docker-tutorial.git into the terminal and pressing Enter. After it downloads we are going to type cd client to get inside the client folder.
Here we will create a Dockerfile and add the following to it:
# CLIENT'S DOCKERFILE

# Uses the node:20-alpine image as the base image for the container.
FROM node:20-alpine

# Docker creates an app directory in the container and sets it as the working directory.
WORKDIR /app

# Copies package.json and package-lock.json into the app directory.
COPY package*.json .

# Install the package.json's dependencies.
RUN npm install

# Copies all the files from the client folder to the app directory.
COPY . .

# The Docker container listens on port 3000.
EXPOSE 3000

# Executes npm run dev when the container starts.
CMD ["npm", "run", "dev"]
Then we’ll create a .dockerignore file and also add the following:
# CLIENT'S .DOCKERIGNORE

# Logs
logs
*.log
npm-debug.log*
yarn-debug.log*
yarn-error.log*
pnpm-debug.log*
lerna-debug.log*

node_modules
dist
dist-ssr
*.local

# Editor directories and files
.vscode/*
!.vscode/extensions.json
.idea
.DS_Store
*.suo
*.ntvs*
*.njsproj
*.sln
*.sw?

Dockerfile
.dockerignore
So, to give a brief explanation, the Dockerfile will take our base image (node:20-alpine). The base image is a starting point for certain technologies important to our project (e.g. Node.js and MongoDB) to create a Docker image. When we run Docker, the Dockerfile takes the base image(s) along with some of the other commands I described in the code, and creates a Docker image. The Docker image is an immutable file that contains everything in our application: source code, libraries, dependencies, their versions, you name it! You can create your own base images, but it’s a lot easier to use the ones created by large companies from this website.
The .dockerignore works similarly to .gitignore, but instead of hiding files we don’t want people to see, it hides files we don’t want Docker to see! The benefit is that it creates a lightweight Docker image that only needs what is absolutely necessary to create its image! If you’re not sure what to add, it’s usually safe to copy everything in the .gitignore and add Dockerfile and .dockerignore. Yes it can ignore itself!
We’re also going to add Dockerfile to our .gitignore. If you’re doing a personal project, I would recommend against it because it’s handy to see the Dockerfile if you need it later on. However, it is common practice to include it to make the app lighter when it’s built for production.
# CLIENT'S .GITIGNORE

# Logs
logs
*.log
npm-debug.log*
yarn-debug.log*
yarn-error.log*
pnpm-debug.log*
lerna-debug.log*

node_modules
dist
dist-ssr
*.local

# Editor directories and files
.vscode/*
!.vscode/extensions.json
.idea
.DS_Store
*.suo
*.ntvs*
*.njsproj
*.sln
*.sw?

Dockerfile // NEW
Next we’re going to modify vite.config.js with the following:
# VITE.CONFIG.JS

import { defineConfig } from "vite";
import react from "@vitejs/plugin-react";

// https://vitejs.dev/config/
export default defineConfig({
  plugins: [react()],

  server: { // NEW
    host: true, // NEW
    port: 3000, // NEW
  },
});
I like to have my client run on port 3000 instead of Vite’s standard 5137, so I’m changing it to that port. If you want to choose your client port, go ahead and replace every instance of 3000 with the number you want. But don’t forget to change EXPOSE 3000 in our Dockerfile too!
Now we’re going to cd .. then cd api to add a Dockerfile and .dockerignore, and modify its .gitignore.
# API'S DOCKERFILE

FROM node:20-alpine

WORKDIR /app

COPY package*.json .

RUN npm install

COPY . .

EXPOSE 5000

CMD ["npm", "start"]
# API'S .DOCKERIGNORE
node_modules
Dockerfile
.dockerignore# API'S .GITIGNORE
node_modules
Dockerfile // NEWFor those of you who want a little bit of a bonus challenge: See if you can explain in your own words each line of the Api’s Dockerfile! Feel free to refer back to the Client’s Dockerfile though.
From here the last bit of coding we have to do is create a docker-compose.yml file! So let’s cd .. back into our root folder (mern-docker-tutorial), and create the file. We’re going to add the following:
# DOCKER-COMPOSE.YML

version: "3"

# docker-compose builds client and api images, then runs them in their containers.
services:
  client:
    # Builds the client image using the Dockerfile in the client directory.
    build:
      dockerfile: Dockerfile
      context: ./client
    # Gives this container a name.
    container_name: mern_docker_tutorial_client
    # Holds all the environment variables, but currently commented out since we don't have any.
    # environment:
    # Maps the local machine's port 3000 to the container's port 3000.
    ports:
      - "3000:3000"
    # Maps the local machine's client directory to the container's app directory
    volumes:
      - ./client:/app
      - /app/node_modules

  api:
    build:
      dockerfile: Dockerfile
      context: "./api"
    container_name: mern_docker_tutorial_api
    # environment:
    ports:
      - "5000:5000"
    volumes:
      - ./api:/app
      - /app/node_modules
This file allows us to create multiple Docker containers simultaneously. So in the above code, there is a section for client and api. It will build a Docker container using the Docker image from its Dockerfile. A Docker container is the container I mentioned earlier for our app. Quick side note: Dockerfiles are immutable, but we can create multiple Docker containers from the same Dockerfile! You’ll also notice there is a commented our environment. That is where you would place your environment variables!
And the final bit is to create the root folder’s .gitignore and the following line:
# ROOT FOLDER'S .GITIGNORE

docker-compose.yml
And all the changes are done! Go ahead and give yourself a pat on the back! Now we’re going to run our dockerized app!
Running the Dockerized App
We’re going to click on the Docker Desktop we should’ve downloaded and wait for that to finish preparing. Then we’re going to open our terminal (do you remember the shortcut?), and type docker-compose up --build. This will execute the docker-compose.yml file creating two Docker images for client and api, then creating a Docker container for each. If you check your Docker Desktop, you should see the following:
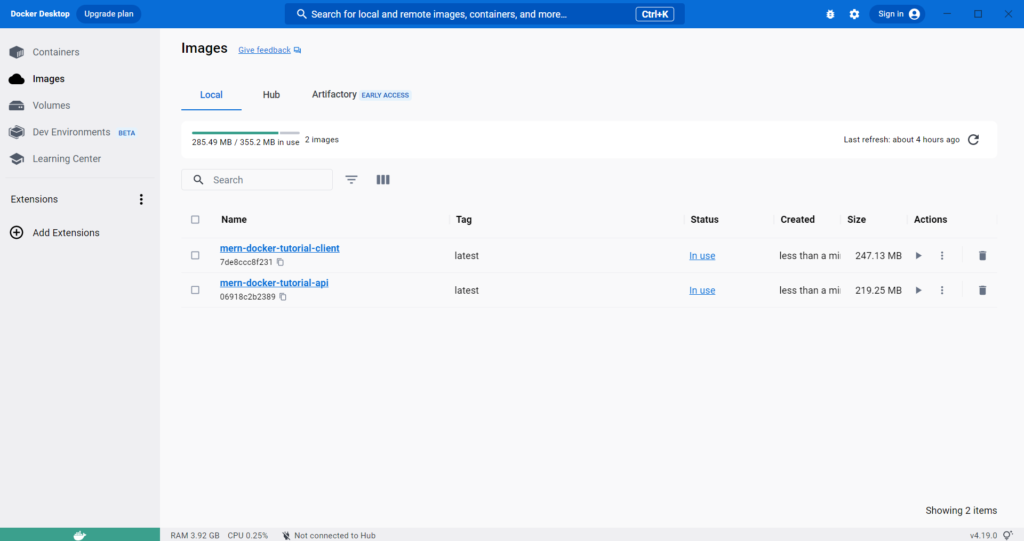
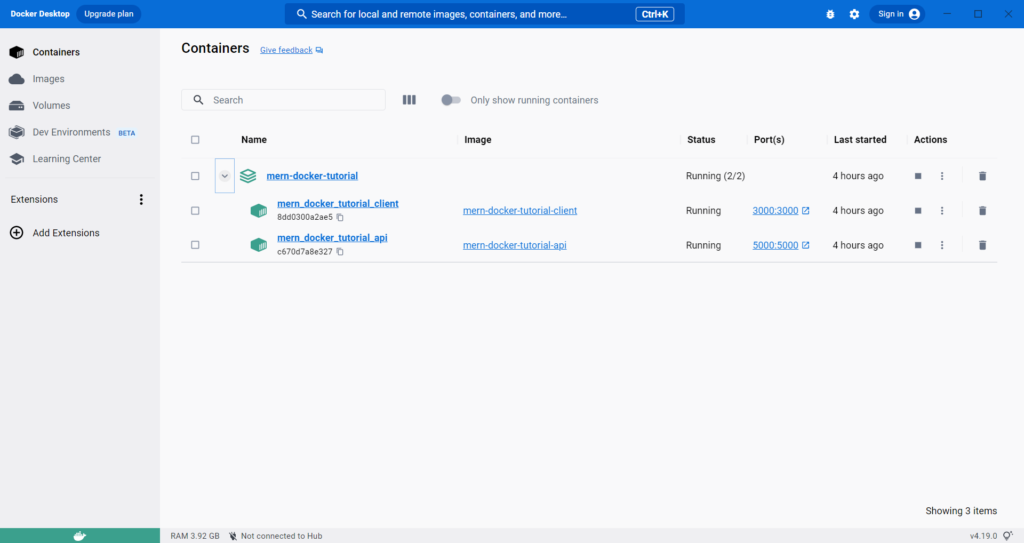
Notice how they are green? That means that they are in use! If it’s gray it means they are deactivated and orange means something went wrong!
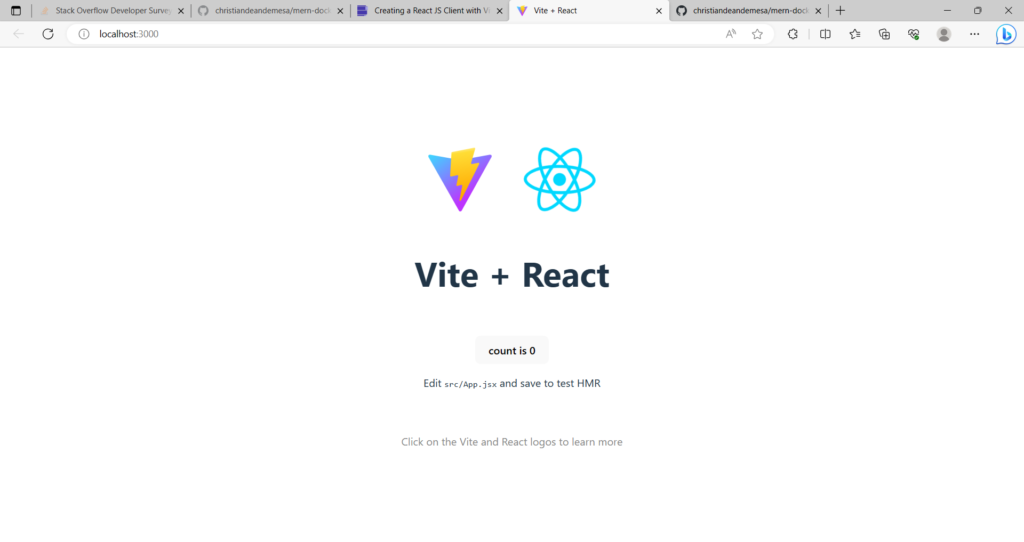
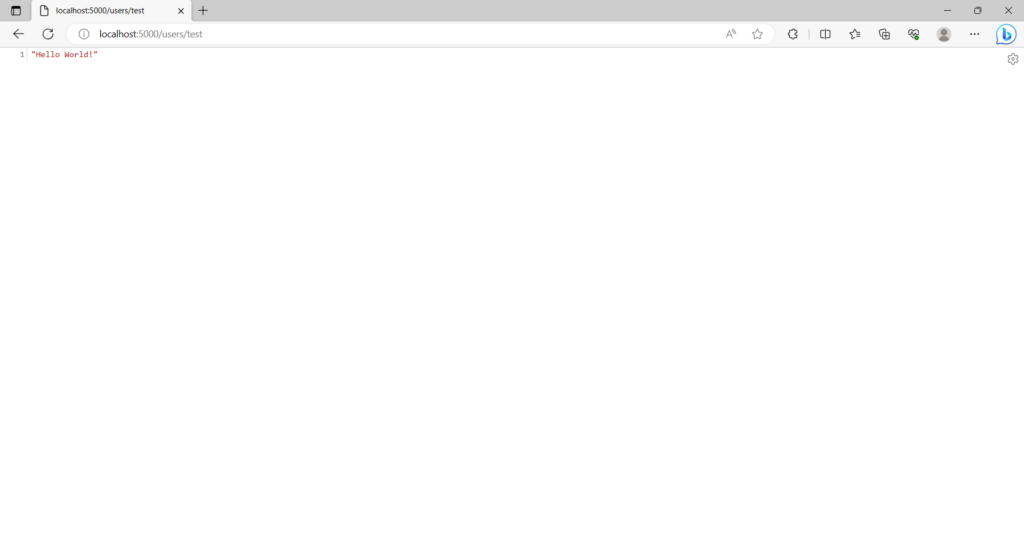
Assuming everything is going smoothly, go ahead and open your browser and check localhost:3000 for the client and localhost:5000/users/test for the api to see the following:
And there we have it! Dockerized a full-stack MERN app! If you want a little bonus challenge, some of you may have noticed a mentioned a MongoDB base image. See if you can try to include it (Hint: Api’s Dockerfile).
If you had any trouble following along, go ahead and check here! This is a branch in the repo for the final code, although I hid the Dockerfiles (my bad…). Anyway, I hope this was easy and remember…
Well-being is attained by little and little and nevertheless is no little thing in itself.
~ Zeno of Citium

Thanks for a great tutorial. I’m so going to have to try this, but you explained it really well. You did a great job.
No problem! Thanks for checking out my blog. If you have any other coding tutorials you want me to explain, just let me know!