
Hello and welcome to the first coding tutorial! I understand that coding by yourself can be hard because I have lived through it every single day: combing through documentation, pulling up countless articles and youtube videos, attempting to recreate it in your IDE only for a random error to pop up! That’s why I created this tutorial to start our journey through React.
Some prerequisites before we get started:
- 1) You do not need any coding experience to follow along, although having some knowledge will go a long way to your understanding.
- 2) The IDE I am using for this tutorial is VS Code, which you can download here.
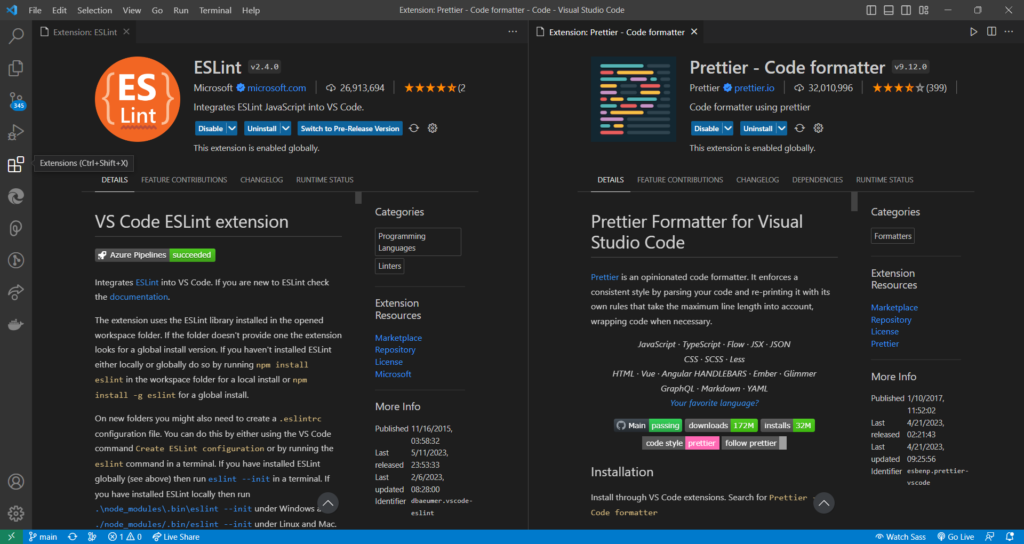
- 3) After opening VS Code, you need to click Extensions in the sidebar (looks like tetris blocks), download the ESLint and Prettier extensions as seen below, and follow their instructions.
- 4) Next you need to download Node.js here in order to use npm.
Starting our project
- In the above image, you’ll notice in the navbar that there is a section called ‘Terminal’. We’re going to left-click it then left-click ‘New Terminal’.
- A little box should pop up from the bottom that you can type in, and going forward I will call this the terminal. In the terminal type
mkdir app-name(Note:mkdiris a command that creates a folder with the following name, and app-name is whatever you want to name your app). - Then type
cd app-name(Note:cdis a command that moves into the named sub-folder). - We are now going to create our React app by typing
npm create vite@latest. - Name our vite-project client (named as such because this will hold the data that users can visually see and interact with), choose the React framework, and then the JavaScript variant.
- Type
cd client, then typenpm i, and we’re all done (Note:npm iis shorthand fornpm installwhich will install all the dependencies needed in the client folder)!
Below is what the folder structure should look like.

Configuring ESLint
What exactly is ESLint? Well, it allows us to create linting rules for our code!
What are linting rules for our code? It’s a set of rules our code must adhere for consistency, such as syntax.
Why do we need linting rules? Using them allows us to proactively avoid, and easily find and fix coding mistakes.
We will be using Airbnb‘s linting rules because it is standard in the industry as a cornerstone, and it takes less time and effort to use their rules than it would be to create our own.

- In order to use npx in the next step, type
npm i -g npx(Note: -g stands for global and will install npx globally in VS Code, which allows you to use npx for any project without installing it ever again). - We are going to use Airbnb’s linting rules, so we’ll install it by typing
npx install-peerdeps --dev eslint-config-airbnb(Note:--devstands for developer and installs this as a developer dependency [i.e. devDependencies in our package.json file]). - Open our .eslintrc.cjs file and change it to the following:
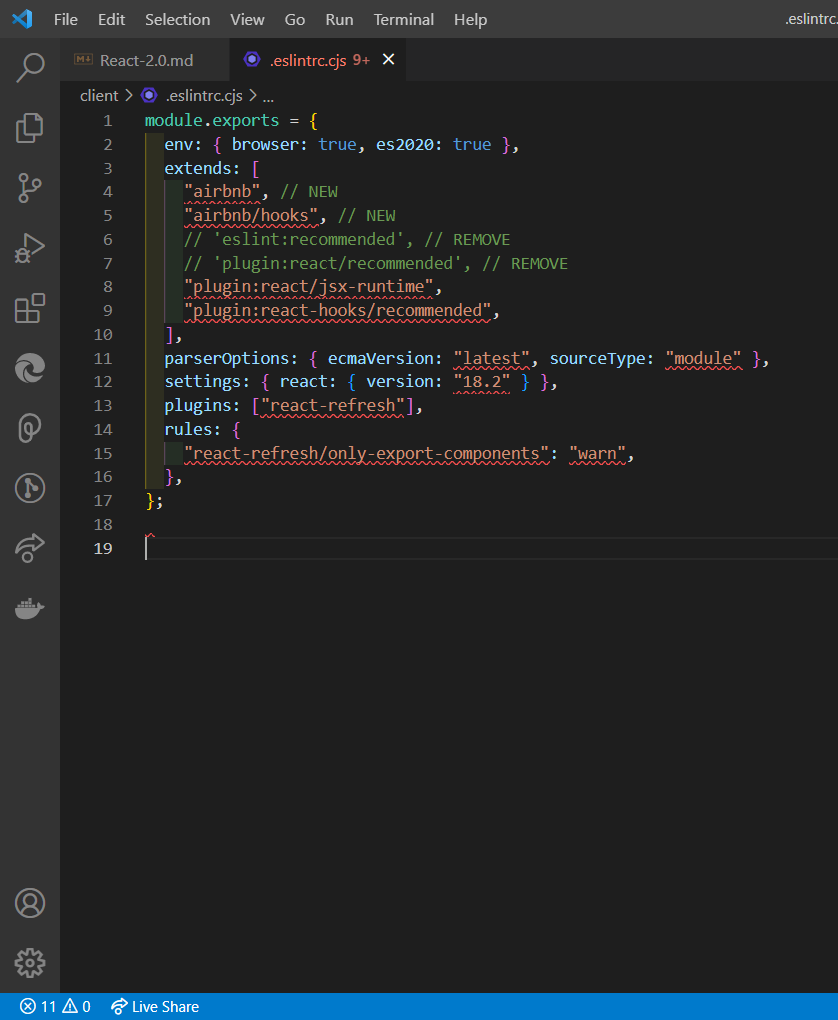
As you can see above, we are adding our Airbnb linting rules and removing the ESLint and React linting rules. We don’t have to delete the ESLint and React rules, but they’re overwritten by the Airbnb rules. It’s always good practice to remove code that is not being used! Also ignore any squiggly lines we have because they will correct themselves after we configure Prettier in our client.
Configuring Prettier
What is Prettier? It is a list of custom rules that changes how our code is shown visually (makes our code look prettier).
Why should we care if our code looks prettier? It makes our code easier to read, especially when there is a lot of it!

- We are going to add Prettier and its ESLint rules by typing
npm i -D prettier eslint-config-prettier eslint-plugin-prettier(Note:-Dis another way to type--dev). - Then we’ll type
touch .prettierrc(Note: touch is a command that creates any type of file, and .prettierrc will hold our custom rules). - Open our .prettierrc file and add the following:
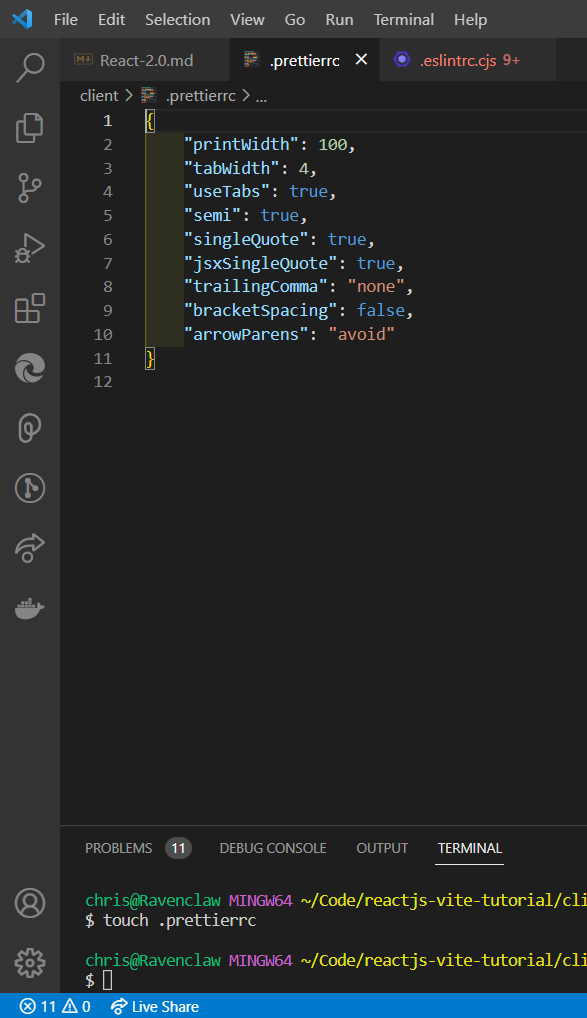
Just to briefly go over what all our custom rules do… *DEEP BREATH* printWidth makes each line of code a maximum of 100 characters give or take a couple, tabWidth makes each indent four spaces, useTabs indents with tabs instead of spaces, semi will always put a semicolon after each line of code, singleQuote uses single quotations instead of double quotations for Javascript strings, jsxSingleQuote does the same but for JSX strings, trailingComma does not put a comma on the last element in array or object, bracketSpacing removes extra spacing within any pair of brackets, and arrowParens removes parentheses from singular parameters in an arrow function *GASP*.
If any terminology in the above did not make sense, don’t worry because it will be addressed in future posts. However, if you still want to know, feel free to put a comment and I will reply! Anyway…
4. Lastly, let’s open up the .eslintrc.cjs file and add the following:
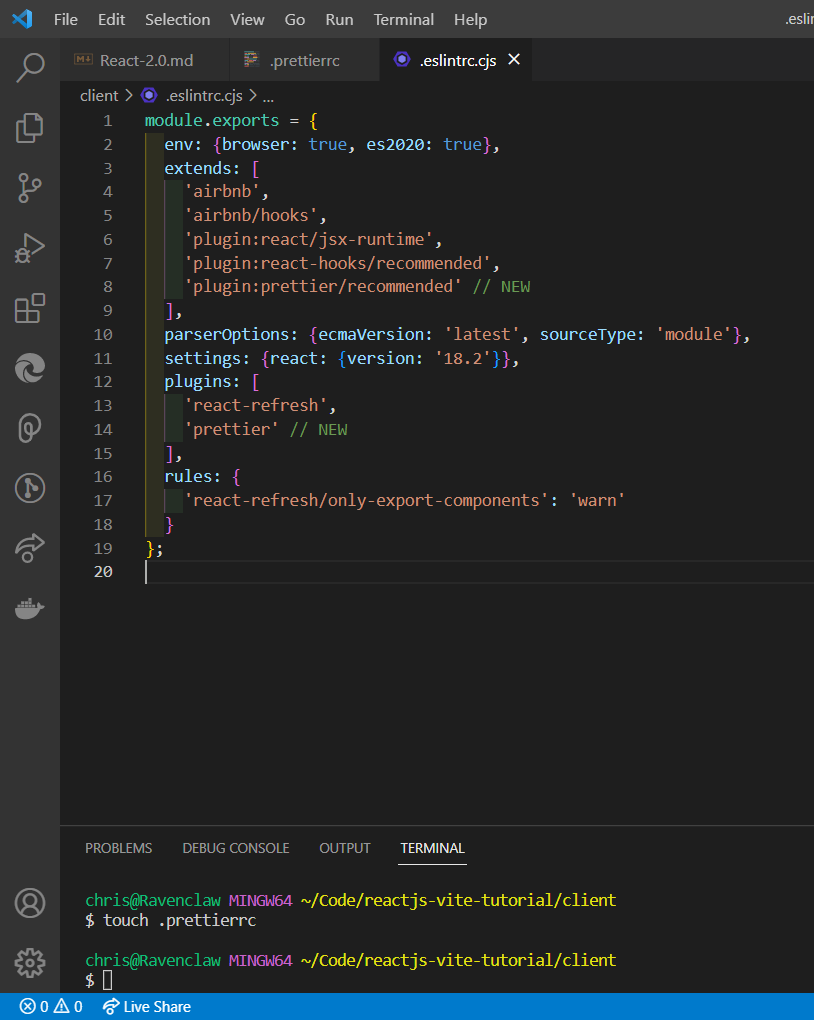
It’s really important that we add Prettier plugin in the extends array last because the order does matter here! The linting rules are read in order, and the most recent rule read will override parts of the previous rule if they are contradictory. So we need to put Prettier’s linting rules last in order to make sure they always have priority. If our ESLint and Prettier rules are not working, press ctrl (cmd on Mac) + shift + p, type reload in the pop-up bar, and click ‘Developer: Reload Window’. And ta-da, it now should work!
Configuring Vitest
What is Vitest? It is used to test parts of our app!
Why do we need to test parts of our code if we can check if it works during development? Well, sometimes what breaks a functional feature in our app could be as simple as something as the function we wrote! Testing it guarantees that functions or even whole React components work. It makes it easier to debug code, and find problems!
We will be including both the Jest and React Testing libraries within Vitest. Jest allows us to perform tests on Javascript code to see if it functions the way we expect, and React Testing simulates how our UI looks in order to make sure it’s displaying properly. Quick side note, UI (User Interface) is what our users visually see and interact with in our app.

- Start by typing npm i -D vitest @testing-library/jest-dom @testing-library/react jsdom.
- Next we open our package.json file and add the following:
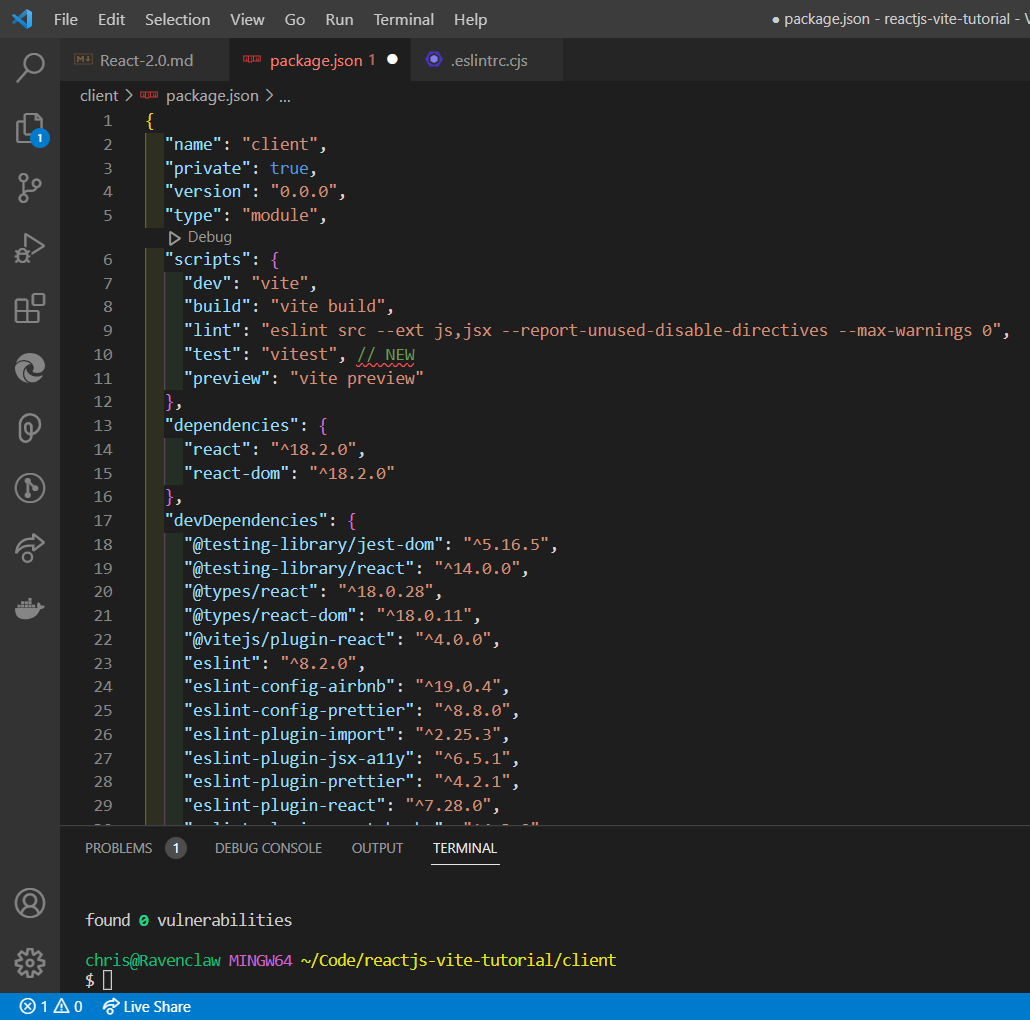
- Then open vite.config.js file and add the following:

- Type cd src to go into our src sub-folder.
- Type touch setupTests.js to create a file to hold our Vitest.
- Finally, open our setupTests.js file and add the following:
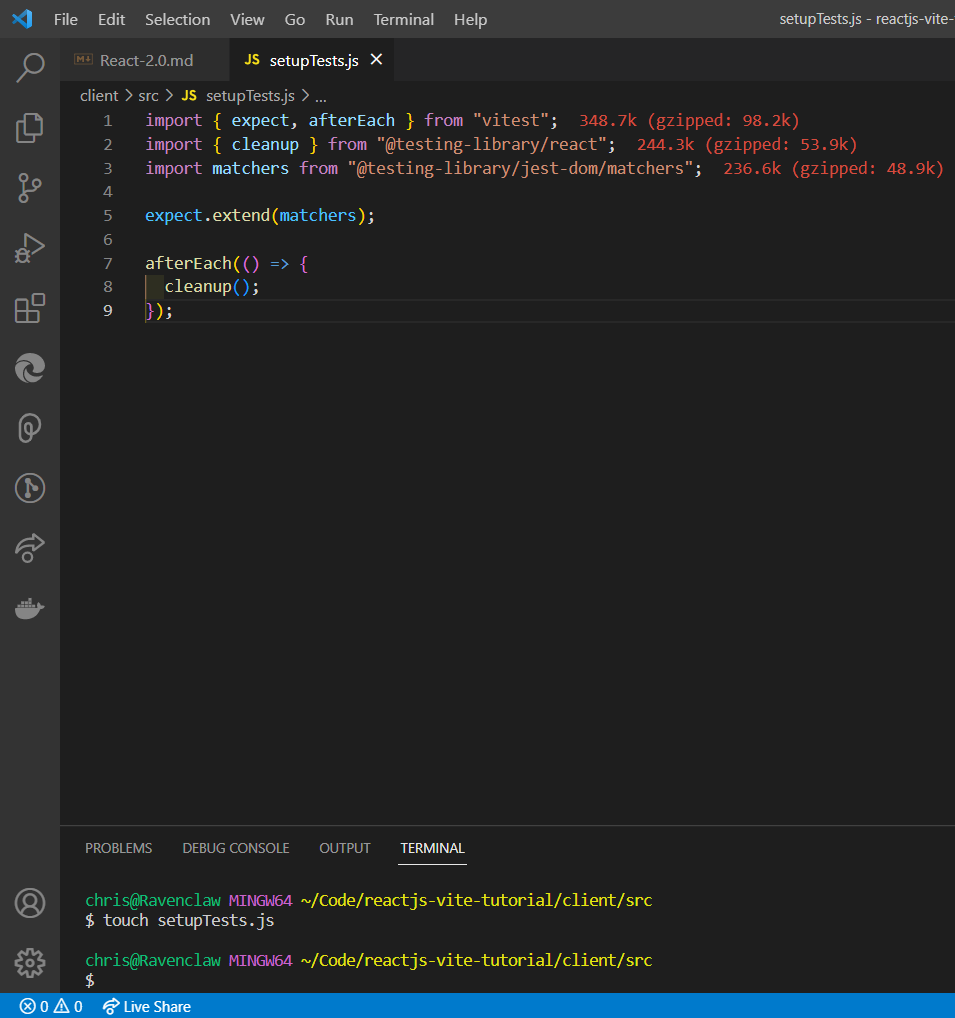
Again this is a lot of code and it is confusing to read at a glance, but we don’t need to know how everything works under the hood in order to use it. As I mentioned before in the Prettier section, if you have any questions then feel free to ask me below. Otherwise we are almost done with this tutorial!
Adding to .gitignore
To put it simply, .gitignore is a file that holds file that should not be shown when published to Github. This will be something I will also cover in a future post, but it’s worth mentioning here. This is an optional step but I recommend following to get into good coding habits. So, we will just copy the below code:
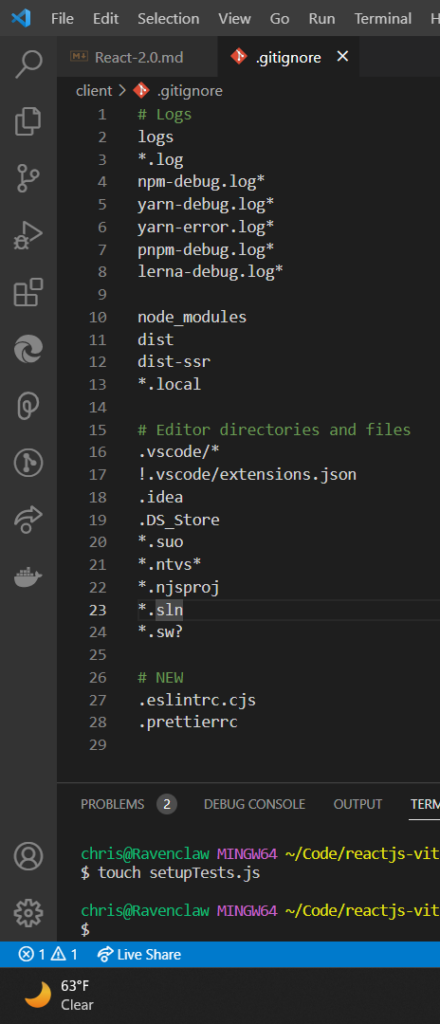
And it is as easy as that! We are finally done with this set up, so give yourself a pat on the back! Woohoo! Thanks for following along with my first coding tutorial and remember…
In the midst of chaos, there is also opportunity.
~ Sun Wu aka Sun Tzu


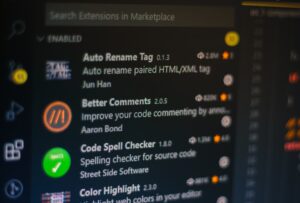
[…] since we created a client in the last tutorial, I think it’s now appropriate to address my IDE of choice: VS Code! Specifically, some […]